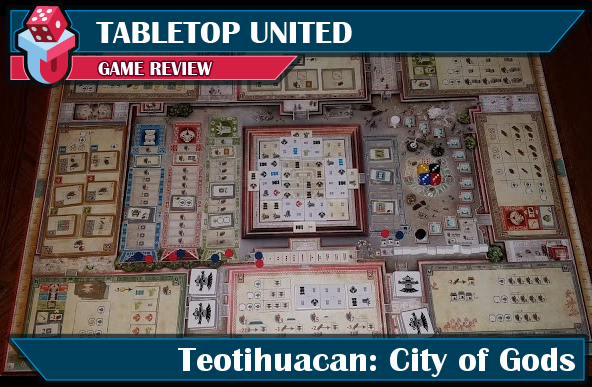
Teotihuacan: City of the Gods Review
Designer: Daniele Tascini, Dávid Turczi
Artist: Odysseas Stamoglou
Publisher: NSKN
Year Published: 2018
No. of Players: 1-4
Ages: 12+
Playing Time: 90-120 min
Main mechanic / Theme: Rondel/Worker Placement
Find more info on BoardGameGeek.com
Overview: In Teotihuacan, you are an ancient Mesoamerican architect building a city as a monument to the gods. This beefy, dice-placement Euro has elements of area movement, set collection, tile placement, and variable player powers.

This is Tascini's follow up to his award-winning Tzolk'in: The Mayan Calander, and has a few things in common. Cocoa is money. The temple tracks work similarly, and you're primarily moving workers around and activating them in order to harvest points. That said, these are two very different games.
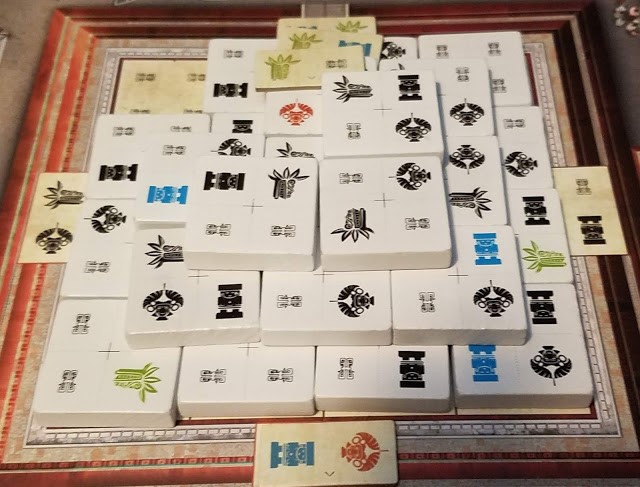
Play revolves around a giant pyramid you will build using a tile placement system that's basically inverted mahjong. You get points based on the number of matching symbols on the tiles you place, plus a level bonus, and maybe a temple track bonus. 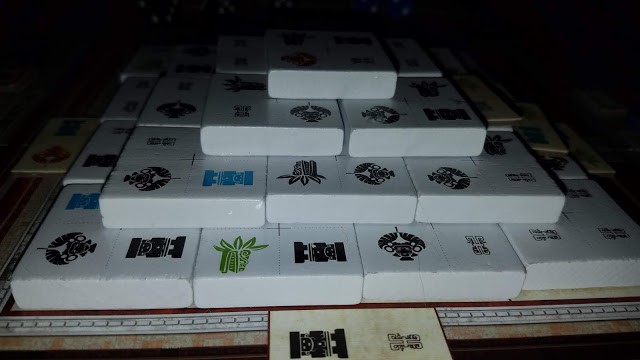
But building the pyramid is only one of a many ways to get points. You're going to be harvesting resources, decorating the pyramid, worshiping at various temples, building houses, trading (sort of), and developing new technologies to make everything run smoother. While all of this is going on, your workers are growing stronger and eventually dying.
There is a lot going on here. It is a glorious game, but a highly technical one. If you don't like brain burners, this probably isn't for you. If your noodle appreciates a good tickling, read on. You'll probably want in on this.
Rules and Setup:
The rulebook is 24 pages long, (1 page of cover, 5 for setup, 9 for rules, 5 for solo rules, and 2 pages of reference material). There are lots of pictures and clarifications in there, too. Learning this was a lot faster than expected. There are several teaching videos, if you prefer.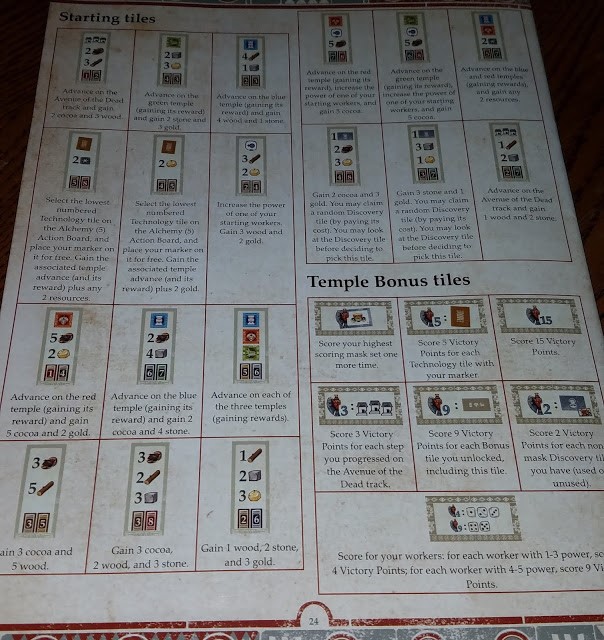
The appendix makes it easy to reference the various tiles.
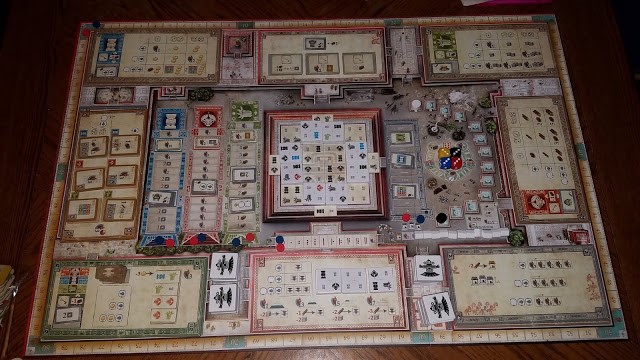
The board has just about everything you need to play printed on it, but it also has a ton of tiles and tokens that can be moved around to add variability from game to game.
To play the beginner game, you "simply" stock the three pyramid tiles, the four decoration tiles, the house row, and all the discovery tile spaces. Place a few tiles on the pyramid (according to the number of players). Then determine first player and and take the staring resources specified in the book. Then choose a color. Take the dice and markers of that color. Place six of your colored markers in the zero spots of the various tracks. Place one 3-value die on the reward space by the Avenue of the Dead track. Set your other three dice to a value of 1 and put them in the buildings specified in the book. The same section tells you what each payer's starting resources are. Some players will go up on a track or two as well. If there are less than four players, three of each unused color will be placed on buildings determined by a random draw of starting tiles. Finally, place the sun marker on the zero space and the moon on 10, 11, or 12 depending on whether you have 2, 3, or 4 players.
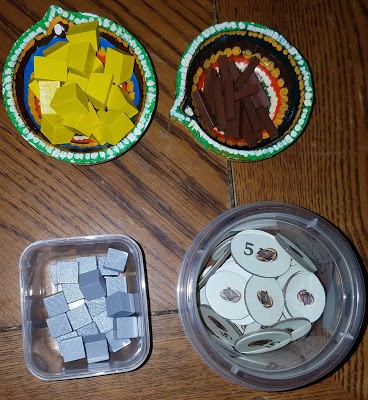
Resources are gold, stone, wood, and cocoa.
Each player will have different stuff starting out. So while you don't quite have variable player powers, you do have various benefits that will change the way you play from the start. The beginner resources and placement are meticulously balanced, and I recommend you use them for your first game.
The advanced game is basically the same but with a lot more setup, which allows use of the many tiles that change the technologies, the Palace actions, Temple bonuses for reaching the penultimate space, and even the position of buildings on the board. Starting resources will be determined by resource tiles. You will draw four, then choose two to gain the resources and bonuses from. If your marker has a temple bonus, bump your marker up on that track and gain the step's bonuses. Those tiles also determine where you can place your initial three worker dice. Each tile has two numbers at the bottom. Each number corresponds to a building. You can pick any three of those four buildings to place dice on (one per number).
It sounds like a lot, but it's not too bad once you know what everything is. When you're done, it should look something like this.
Theme and Mechanics:
Each turn you will move one of your worker dice up to three buildings in a clockwise rotation, then take one of the available actions. Each building has several to choose from.
Actions
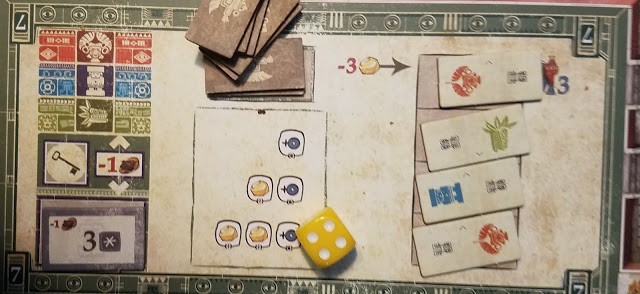
Take Cocoa: You can take Cocoa as an action after moving into any building. Move your die into the main area of a building and gain Cocoa equal to the number of different colors of dice already there plus one. It's not the number of dice there; it's the number of colors, so if there are no dice, you can only get the +1. Four blue dice is one color, so you'd get 1+1=2. A red, a blue, a black, and a yellow would get you 4+1=5.
Worship actions: Several buildings have areas that look like this:
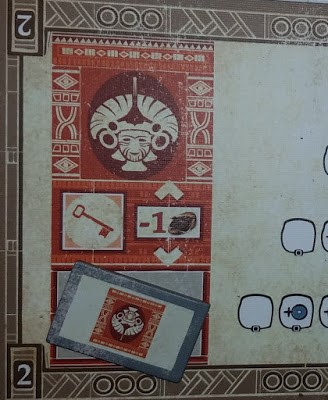
You know how a lot of bookstores have coffee shops built in so you can pay tribute to the coffee gods? These spaces are like that, but for chocolate. If you place your worker on the lock space, you can either gain the top benefit, the discovery tile, or pay a Cocoa to do both. In this instance it's a red temple, and the Discovery tile is also a free bump on the red temple, so you could do either to move up once or pay 1 Cocoa to move up on the red temple twice. That worker can't move until unlocked or bumped out of the space by another player's worker. New Discovery tiles are seeded as soon as the previous one is taken.
Main Actions:
To use the main action, you must pay cocoa equal to the number of different colored dice already there, then do the action.
Buildings are:
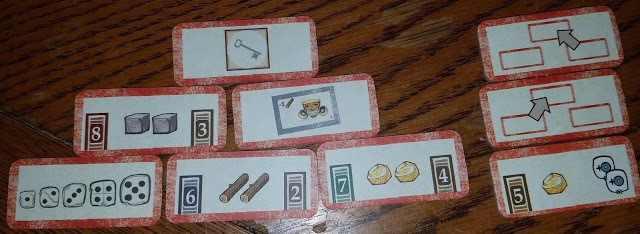
1. Palace: This doesn't have a main action. It's basically a market. Place your dice into one of the lock spaces, then trade the corresponding resources a number of times less than/equal to the strength of that worker. You can also buy the discovery tile for 1 cocoa.
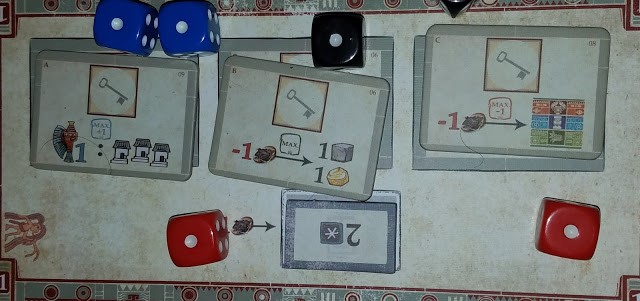
2-3-4 are Forest-Stone Quarry-Gold Deposit: All three work the same, but provide different resources. Place your worker in the main area and gain benefits according to the grid. One worker gets you the reward from the top row depending on the worker's strength. Two dice would get you the reward from the second row and three, the third row. Regardless of how many dice are there, you always reap from the column bearing the value of your lowest value die. Two fives and a one gets you one Cocoa and two wood. Three four-value workers would get you five cocoa and four wood.
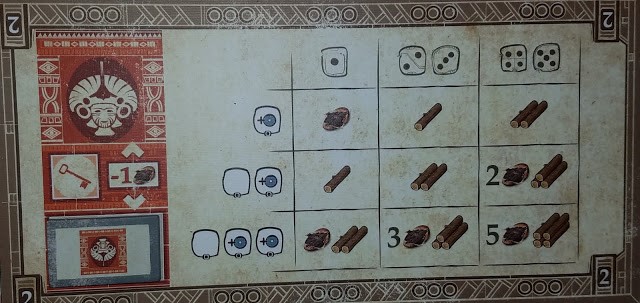
The white square with the blue symbol in it is the symbol for gaining a pip. After you do the action there, increase the strength of one of your workers in that building by gaining a pip. If you have three dice there, you get two power-ups. Once you hit 6, the die "Ascends." You change the 6 to a 1 and place it in the Palace. Then bump your marker up on the Avenue of the Dead track and choose one of the bonuses pictured on the circle depicted next to it. Note that this is not an action, merely a thing that triggers when your die hits 6.
Bonuses starting at 2 o'clock:
5VP: spend 3 Cocoa to go up on 2 Temple tracks (or one twice), Gain 2 Cocoa and your fourth worker, bump up on one temple track for free, or gain 5 Cocoa. Bumping up on Temples will trigger other rewards depending on the space your token lands on.
5. Alchemy: This building offers six different technologies that trigger bonuses when you do the main action of certain buildings. The top row pictured can be obtained with only one die, but the bottom row requires ether two workers or a worker value 4-5. To gain the tech, move a worker there. Pay the gold cost on the tech you want, and place a marker on it. Other players can still gain that tech, but doing so gives you three VP. You also move up on the Temple track that corresponds to the tech you bought.
6. Nobles: Spend two wood to move one house from the unbuilt row to the built row corresponding to the number of dice present in this building. Gain the points on the space you cover and bump your marker up on the Avenue of the Dead.

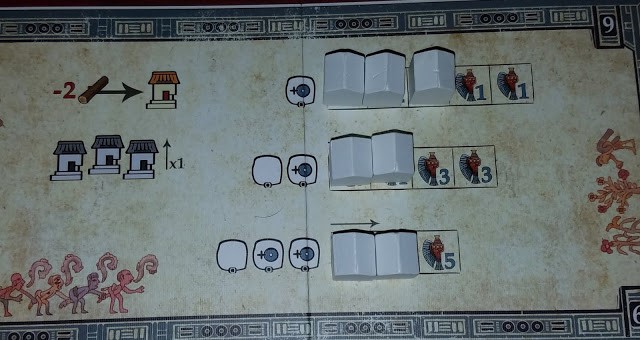
7. Decorations: Pay three gold to place one of the four decoration tiles on the pyramid and move your marker up on the pyramid track. Decorations must be placed from the outside in, and in a way that no Pyramid tile would be placed over any part of the decoration. Each tile also has an arrow that must be pointed toward the pyramid. If you already have 1-2 workers there when you move in, you get a gold discount of 1-2. You gain points equal to 3+ the number of symbols that match the ones you covered. Any time you place a colored symbol over a matching symbol on the pyramid, you also move up on the corresponding Temple track and gain the bonus for that step.
Here's an example where somebody messed up.
That little arrow is pointing the wrong direction.
8. Construction: This is where you build the Pyramid.
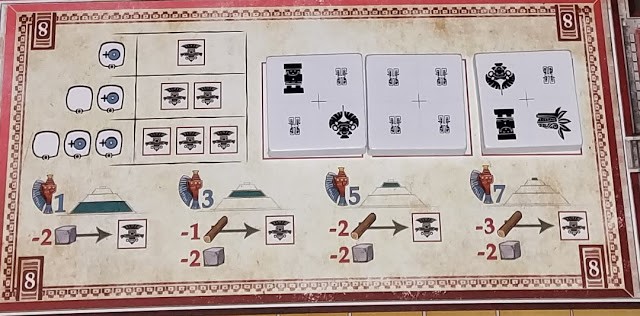
The number of your workers there determines how many tiles you can build. Each level of the pyramid has a specific cost (as shown above). After paying the resources, place any of the tiles into an open space on the level you paid for. Gain points for the level (1-3-5-7) + 1 for every symbol you covered with the symbol. Also move up on the Pyramid track. If you covered any symbol with a matching-colored symbol, move up on that temple's track and gain any associated bonuses.
Don't forget that all those main actions will cost Cocoa if any die is in the space. This is why the non-player workers go out in setup. It makes the cocoa flow.
Unlock workers: Your final option is to unlock your workers who are in Worship spaces by moving them off the key spaces into the building's general area. All it costs is your turn.
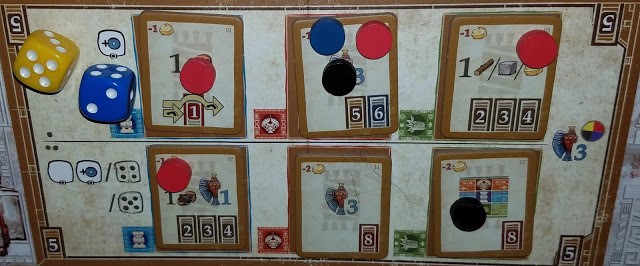
Discovery tiles: These generally provide a one-time bonus. Some have a cost in the corner that must be paid when you receive the tile. Once paid for, you can hold onto the tile and use it later. Some tiles have masks on them. Sets of masks can provide a ton of points every Eclipse, but it's a slow starter and a risky gamble to assume you'll be able to collect enough of them to make it worthwhile. There are a lot of discovery tiles, so they aren't always readily available. Tiles will cycle a lot faster if players worship a lot, but not everybody likes having to lock and unlock workers.
A few examples:
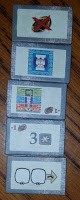
From top to bottom:
1. Spend this token to pay all cocoa for one transaction.
2. Move up on Blue Temple track.
3. Pay one Cocoa to move up on any Temple track.
4. Pay 1 Cocoa to gain any 3 resources.
5. Move two workers from one building to another at the same time.
Temple tracks: These are the three Temples you can move up on.
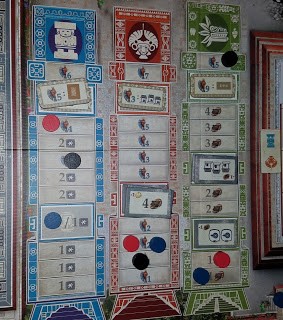
Blue mostly provides resources. Red mostly points. Green is mostly Cocoa. If you reach a step with a discovery tile on it, you can take the reward printed on it or any of the tiles on that step, provided you can pay its cost. Only one player can reach the top step, but any number of players can reach the penultimate step and score its bonus at the end.
Eclipse:
After the Last Player finishes their turn, they will move the Sun one space closer to the Moon. Also, whenever a worker Ascends, it moves the Moon tracker closer to the Sun. When they overlap, each player gets one more turn before Eclipse scoring. There are three Eclipses over the course of the game. After the third, the player with the most points wins.
To score an Eclipse:
Get points for:
Avenue of the Dead - Multiply the number of the step you are on by the lowest number showing on the unbuilt houses row. Gain that many points.
Pyramid track - The player farthest ahead gets 4 points. Then all players get points for each space they've moved up (4-3-2 depending on whether it's the 1st-2nd-3rd Eclipse). Reset all tokens on the Pyramid track to 0 (zero).
Score Mask sets - These are on discovery tiles. Score 1/3/6/10/15/21/28 points depending on the number of different masks you have in a set.
Pay workers: Each worker you have with a value 1-3 gets a salary of 1 Cocoa. 4-6 gets 2 Cocoa. You will lose 3 points for each worker you can't pay.
Eclipse 1-2: reset the sun and moon.
Eclipse 3: Players who reached the penultimate space on the Temple tracks scores the bonuses on them.
After the third Eclipse, the player with the most points wins.
Solo mode: Taotibot's actions are determined by a pyramid of shifting tokens and dice rolling.
Each tile in the pyramid corresponds to a building. At the beginning of the bot's turn, roll the two dice that weren't placed on the board during setup. Add them together to see which tile activates. These don't quite work like your actions. Each has its own tree of if-this-then-this, if-not-then-this, if-neither-then-this. Once you have done the appropriate action, the activated tile rotates out. The top tile to the right tells you which tile moves up to take it's place. Finally, place the seventh tile in the hole left by the tile that just moved up. The move tile is then flipped over and moved beneath the other one.
GamePlay:
Teotihuacan is a highly technical game with boatloads of action options every turn and many avenues for gaining points branching off from those options to create a strategic tesseract that it's easy to get lost in. A lot of actions will trigger multiple costs and rewards that will trigger more costs and more rewards. I always want to rush through all the math and pay for everything at once, but that's a slippery slope. I'll frequently start second-guessing, rewinding, or wondering if I've bumped up a tracker or gotten a reward. It's easy to forget to use technologies you've unlocked or even to go several rounds getting a tech bonus that you were going to unlock but changed your mind about on a previous turn. There is a lot of math to consider before you form a strategy. Your level of success will depend on your ability to crunch those numbers, set specific goals to work toward, and follow through gaining all of the bonuses you've earned each turn.
This is a lot of fun if you like a big heavy game. The current weight on Board Game Geek is 3.7, and I would compare its weight to Lisboa (a 4.51 and one of my all-time favorites). The latter is much harder to learn, but the play isn't too complicated once you understand it. Teotihuacan is much easier to learn, but play is more complex. In my opinion, both should be closer to a 4.0, but I'd still say Lisboa is heavier, because afterward, I'm tired. I feel like I just built a city with my brain. After Teotihuacan, I'm ready to play again.
Play generally moves at a good pace, but those prone to analysis paralysis (AP) will likely glitch out a few times each game.
Artwork and Components:
All the components are very high quality. Despite the variety of iconography, it's clear enough that I rarely need to use the appendix. This is less true in the solo mode. I still have to reread each step of each bot action every time, but I don't play a lot of games solo, so it could just be me.
The Good:
It's fun.
This is a meticulously balanced masterwork of logic.
It provides a lot of space for your brain to romp.
The board beautiful, and the components are excellent quality.
The Bad:
Fairly complicated setup.
This game defines fiddly. There are variable costs associated with most everything, then you get variable rewards that sometimes trigger secondary rewards with various costs, which then might trigger a third reward which also might have variable costs. While carrying out all these transactions, you also have to crunch tons of numbers to figure out which point-branch is best. Then we have technology that provides additional bonuses at certain locations. On top of that, dice gain a pip at many locations, and if they hit 6 they trigger another three things that can start another chain of costs and rewards. All that is basically one action. That's part of what makes this game so cool, but it's also a little irritating having to perform so many microtransactions in a single turn.
Final Thoughts:
Teotihuacan feels like playing a mid-weight farming game and a mid-weight tile placement game simultaneously. I love that. The balance is spectacular. Fiddlyness aside, it's an amazing game that's going to spend a lot of time on my table.
For Players Who Like:
Heavy euros. Brain burners. Point salad. Technical gameplay. City building. Tile placement. Lots of options. Dice placement. Variable worker powers. Combos

Stephen Gulik is a trans-dimensional cockroach, doomsday prophet, author, and editor at sausage-press.com. When he’s not manipulating energy fields to alter the space-time continuum, he’s playing or designing board games. He has four cats and drinks too much coffee.